|
White 6: The large knight is a hard move to handle (too many difficult invasion points), so maybe something to avoid until you're high SDK or Dan level. In this particular case, it's not a strong attack and not a good extension, so it feels lukewarm in lots of areas and strong in none. Prefer moves that are strong in one task and have secondary tasks they also somewhat help at.
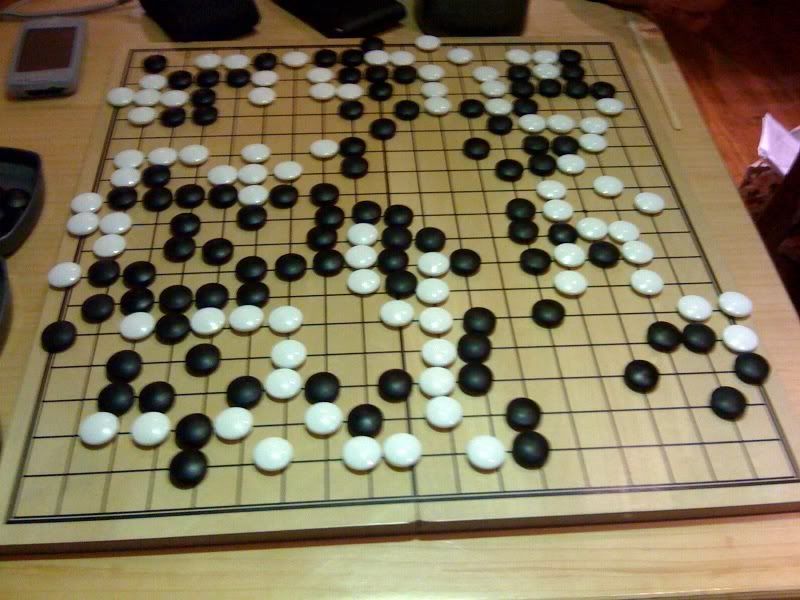
On a grand strategic level, black is concentrated heavily on one quarter of the board. Go grab some more corners and spread out.
White 60: Obviously this is not the time to beak from the capture race. To prevent these sorts of mistakes, when you want to tenuki (that is, not responding directly to your opponent's last move), make sure you count out liberties on groups touched by black's last move. DO NOT Tenuki unless your group has more liberties than ALL black groups touched by your group. OR if your group has a large number of liberties anyway (5 or 6) or is strongly connected (eg: tiger's mouth, diagonal connection) to another group with lots of liberties.
In this case, without doing any reading at all, your group has two liberties, and is touching 3 groups. Two have 2 liberties, and one has 3 liberties. You need to increase the liberties of your group; you're at a disadvantage.
White 68: Black is not killable. Your corner still is, though. Black at C18, for instance, causes all sorts of nasty problems. Rewinding a bit, Move 66 is off. When you need life, haneing on the first line is (almost) always a terrible idea. Prefer descending. In this case, though, I think you need to go B18. White then goes D19 and you go C19 and start a ko. Not sure about the timing of when to go for this, though. But I'm not great at life and death so maybe a stronger player has better ideas. But the point is that the hane at 66 is about the worst thing you can do, and following it up with 68 (which is basically -1 point in gote) when your corner is still in danger is not a great idea.
White 82: This side group is also dead before you even started once black made a move. Connecting at 82 especially means you should have died in gote. Your opponent was generous in responding and giving you sente.
White 84: Star point might not be the best choice. Star stones like fast development along the sides, but one of the sides is really cramped. I would have played maybe the 3-3 and take solid territory? Or 3-4 at D3 maybe. You want to tempt black to approach you on the left side, since then his thickness is over concentrated. Ideally black wants to approach you on the bottom side, and force you up along the left side, towards his thickness. So make moves to discourage that.
This corner might not be the best choice, either (other corner looks more open).
White 86: Stay away from thickness. There's nothing interesting on this side. The bottom is still open. Go in that direction. Also, the star stone favors fast development. Having played it, you should generally make large extensions (eg: K3) before small extensions.
White 126: Black didn't call you on it, but count your liberties. Black M16 and you're captured. Black L14 was actually a rather clever tesuji. I'm surprised black was smart enough to make this move but didn't realize enough to capture stones in atari.
White 130: This is not an interesting area. You're just stealing a small handful of points from black. There's still an empty corner and side! Use sente to grab those.
White 134: Protect cutting points directly. Don't be greedy. White at J8 is proper. Unless you don't mind sacrificing the stones in his belly. In which case, take sente.
White 208: Double hane to the first line is usually not correct. There are also bigger points on the upper right corner.
White 232: Not necessary. Black can't cut at R7 because he puts himself in atari. Hopefully you'll see if your O7 group is in atari before its taken, and you can always just connect at R7.
White 244: This is probably the worst point on the board to go for. It's worth less than 1 point. You're already safe, so you don't need it for life or anything.
Black 259: He's delerious. This is worth 0 points.
White 260: This is worth 1 point in gote. There are bigger points on the board.
White 262: Yes, ignore black's dame insanity.
White 266: Damage is done in this area already. There are bigger points on the board still. Moves near the edges in the endgame are bigger than they appear.
White 278: Issues of ignoring atari aside, this is worth 0 points in gote. There are bigger points on the board.
White 284: If black takes that lone stone in atari, you capture in a snapback. There's no need to defend this single stone.
White 219: Yes, do not let the group reach the edge. Connecting to the edge is worth like 3 stones along the side.
...
As some general points:
1. Count your liberties. This gets better with experience, when you almost automatically read sequences out. But get in the practice anyway, because larger and more complicated capture races lie in your future. If you have fewer liberties than your opponent, you're in trouble. This applies only during the opening and mid games. In the end game, issues of +/- 1 point are more important.
2. Your opponent played unreasonably. Basically if there was an empty place in your territory, an atari, or a cut to be made, he put stones there. This sort of opponent is hard to handle, because it's easy to throw stones around and hard to find good ways to refute. DO NOT follow such opponents around the board. Well, you shouldn't follow any opponents around the board, but double especially it's a bad idea with this sort of opponent. Catch when he plays small moves, and take the initiative to play large moves. Catch when he plays close with cuts and ataris and see if there's a better way to reform the territory boundary further back. He'll be happy to capture 1 stone with 2 moves as you get two free moves to reform a stronger wall a few spaces back. Sort of like judo; use his momentum against him. Take pride in letting such opponents kill groups of your stones with multiple moves as you take control of the rest of the board and win by healthy margins (which is what you did in this game but I suspect it was by accident).
3. In the end game, play on the third, second, and first lines. Moves along the edges are larger than they look. If you find yourself playing a stone on the first line, see if there isn't a move on the second or third line somewhere else on the board. These are probably larger moves.
|