I often see here posts from players who say they want to study the openings, and those who successfully avoid the dragon's nest of joseki end up talking about fuseki, but mostly in terms of either a specific opening (usually the Chinese), moyos or style - which is a bit limited, as the possibilities are rather open-ended.
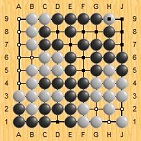
However, I noticed recently an interesting opening used by top players which combines these three things into one package. And as there are more stones than with, say, the ordinary Chinese or Kobayashi, shapes are more fixed and so easier to study. But this opening - see below - also has the merit that the next move for Black is a straightforward choice between a centre strategy (A, but sometimes preceded by B) or territory (C). Both lines are considered joseki.
This particular pattern dates from 2011 and is still cutting edge, so the number of games is very manageable (the workshop edition of GoGoD has about a dozen). But the pattern can also be played (but not so often) with an ordinary shimari in the lower right, or (rarely) with a bigger Chinese shimari (there's food for thought even in that).
The shape in the upper right quadrant goes back to the 1930s, however (beginning with a couple of Go Seigen games), so if you wished to extend your study you'd have well over 100 games to look at.
To me, the most interesting aspect is the stark dichotomy between the centre strategy and territory choices, simply because with this opening it seems fairly easy to follow the rest of the games in those terms.
Suggestion for study
-
John Fairbairn
- Oza
- Posts: 3725
- Joined: Wed Apr 21, 2010 3:09 am
- Has thanked: 20 times
- Been thanked: 4739 times
-
logan
- Lives in gote
- Posts: 641
- Joined: Sat May 29, 2010 11:52 am
- GD Posts: 9
- Has thanked: 141 times
- Been thanked: 438 times
Re: Suggestion for study
On a separate note, while the full joseki sequence in the top-right may have emerged in the 1930s, the key move that began it all was the push up O16, rather than O18, in a Honinbo Shuei game. In that game Black cuts from the other side. In fact, I believe it's the only example we have of a professional cutting from the other side (up to 2010), which may satisfy the curiosity of some readers:
There's also the option of 'a' and 'b'. Although we usually see 'a', 'b' is also acceptable, and you will find many games with this variation:
The standard followup patterns are as follows:
This variation preserves the ko and ko threats on the corner:
After White defends the corner, Black will play 'a' or 'b':
Back to the more common variation, I can't remember where, but I thought there was an article about research of the net-like move of -- discussed by Rin Kaiho or the like. It involved preserving options and aji for Black.
Takemiya 'Cosmic' Masaki also likes Black 'a':
There's also the option of 'a' and 'b'. Although we usually see 'a', 'b' is also acceptable, and you will find many games with this variation:
The standard followup patterns are as follows:
This variation preserves the ko and ko threats on the corner:
After White defends the corner, Black will play 'a' or 'b':
Back to the more common variation, I can't remember where, but I thought there was an article about research of the net-like move of
Takemiya 'Cosmic' Masaki also likes Black 'a':
-
Loons
- Gosei
- Posts: 1378
- Joined: Tue Apr 20, 2010 4:17 am
- GD Posts: 0
- Location: wHam!lton, Aotearoa
- Has thanked: 253 times
- Been thanked: 105 times
Re: Suggestion for study
Interesting, I had never really thought about this joseki outside sanrensei. Choice of continuation seems like it would be really sensitive to white's choice of gote on the left.
John, is there 'studying pro moves' advice that you feel hasn't percolated through to 'the west' properly yet?
John, is there 'studying pro moves' advice that you feel hasn't percolated through to 'the west' properly yet?
-
Uberdude
- Judan
- Posts: 6727
- Joined: Thu Nov 24, 2011 11:35 am
- Rank: UK 4 dan
- GD Posts: 0
- KGS: Uberdude 4d
- OGS: Uberdude 7d
- Location: Cambridge, UK
- Has thanked: 436 times
- Been thanked: 3720 times
Re: Suggestion for study
Something I picked up from An Younggil's commentary of game 3 of the Lee-Gu jubango is that the push up is effective when you want to create the invasion point at r13 (as black pushing and cutting loses a liberty) which if there is another invasion point in the moyo makes solidifying it a pain. So the defence at c is fixing that, and on John's board the cut isn't such a problem yet as black's moyo is so huge he would happily sacrifice if white cuts too early.
From http://gogameguru.com/go-commentary-gu- ... go-game-3/ (move 10 variation 2, mv 15 var 2). Black's marked push is slightly better than the other joseki of b14 as white has two invasion points at a and b. (In case you don't know a, the idea is after playing there you have miai of sliding/attaching to the right and the d18 hane and crosscut which is a ko to connect thanks to shortage of liberties on white's stick (or two stone edge squeeze to kill white)).
From http://gogameguru.com/go-commentary-gu- ... go-game-3/ (move 10 variation 2, mv 15 var 2). Black's marked push is slightly better than the other joseki of b14 as white has two invasion points at a and b. (In case you don't know a, the idea is after playing there you have miai of sliding/attaching to the right and the d18 hane and crosscut which is a ko to connect thanks to shortage of liberties on white's stick (or two stone edge squeeze to kill white)).
-
yoyoma
- Lives in gote
- Posts: 653
- Joined: Mon Apr 19, 2010 8:45 pm
- GD Posts: 0
- Location: Austin, Texas, USA
- Has thanked: 54 times
- Been thanked: 213 times
Re: Suggestion for study
The ko Uberdude mentioned is shown here:Uberdude wrote: From http://gogameguru.com/go-commentary-gu- ... go-game-3/ (move 10 variation 2, mv 15 var 2). Black's marked push is slightly better than the other joseki of b14 as white has two invasion points at a and b. (In case you don't know a, the idea is after playing there you have miai of sliding/attaching to the right and the d18 hane and crosscut which is a ko to connect thanks to shortage of liberties on white's stick (or two stone edge squeeze to kill white)).
http://eidogo.com/#kjd:pdqfqhqcpcqdpepf ... ocncnbodoa