$$Bcm8 Prisoners:
$$ ---------------------------------------
$$ | . . . . . . . . . . . . . . . . . . . |
$$ | . . . . . . . . . . . . . . . . . . . |
$$ | . . . . . . . . . . . . . O . . . . . |
$$ | . . . , . . . . . 2 . . . . . X . . . |
$$ | . . O . . . . . . . . . . . . . . . . |
$$ | . . . . . . . . . . . . . . . X . . . |
$$ | . . . . . . . . . . . . . . . . . . . |
$$ | . . . . . . . . . . . . . . . . . . . |
$$ | . . . . . . . . . . . . . . . . . . . |
$$ | . . . , . . . . . , . . . . . , . . . |
$$ | . . . . . . . . . . . . . . . . . . . |
$$ | . . . . . . . . . . . . . . . . . . . |
$$ | . . . . . . . . . . . . . . . . X . . |
$$ | . . O . . . . . . . . . . . . . . . . |
$$ | . . . . . . . . . . . . . . . . . . . |
$$ | . . . X . . . . . , . . . . . X . . . |
$$ | . . . . . . X . . . . . . O . . . . . |
$$ | . . . . . . . . . . . . . . . . . . . |
$$ | . . . . . . . . . . . . . . . . . . . |
$$ ---------------------------------------
$$ ---------------------------------------
$$ | . . . . . . . . . . . . . . . . . . . |
$$ | . . . . . . . . . . . . . . . . . . . |
$$ | . . . . . . . . . . . . . O . . . . . |
$$ | . . . , . . . . . 2 . . . . . X . . . |
$$ | . . O . . . . . . . . . . . . . . . . |
$$ | . . . . . . . . . . . . . . . X . . . |
$$ | . . . . . . . . . . . . . . . . . . . |
$$ | . . . . . . . . . . . . . . . . . . . |
$$ | . . . . . . . . . . . . . . . . . . . |
$$ | . . . , . . . . . , . . . . . , . . . |
$$ | . . . . . . . . . . . . . . . . . . . |
$$ | . . . . . . . . . . . . . . . . . . . |
$$ | . . . . . . . . . . . . . . . . X . . |
$$ | . . O . . . . . . . . . . . . . . . . |
$$ | . . . . . . . . . . . . . . . . . . . |
$$ | . . . X . . . . . , . . . . . X . . . |
$$ | . . . . . . X . . . . . . O . . . . . |
$$ | . . . . . . . . . . . . . . . . . . . |
$$ | . . . . . . . . . . . . . . . . . . . |
$$ ---------------------------------------
- Click Here To Show Diagram Code
[go]$$Bcm8 Prisoners:

$$ ---------------------------------------

$$ | . . . . . . . . . . . . . . . . . . . |

$$ | . . . . . . . . . . . . . . . . . . . |

$$ | . . . . . . . . . . . . . O . . . . . |

$$ | . . . , . . . . . 2 . . . . . X . . . |

$$ | . . O . . . . . . . . . . . . . . . . |

$$ | . . . . . . . . . . . . . . . X . . . |

$$ | . . . . . . . . . . . . . . . . . . . |

$$ | . . . . . . . . . . . . . . . . . . . |

$$ | . . . . . . . . . . . . . . . . . . . |

$$ | . . . , . . . . . , . . . . . , . . . |

$$ | . . . . . . . . . . . . . . . . . . . |

$$ | . . . . . . . . . . . . . . . . . . . |

$$ | . . . . . . . . . . . . . . . . X . . |

$$ | . . O . . . . . . . . . . . . . . . . |

$$ | . . . . . . . . . . . . . . . . . . . |

$$ | . . . X . . . . . , . . . . . X . . . |

$$ | . . . . . . X . . . . . . O . . . . . |

$$ | . . . . . . . . . . . . . . . . . . . |

$$ | . . . . . . . . . . . . . . . . . . . |

$$ ---------------------------------------[/go]
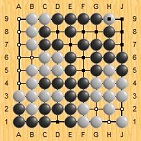
Very calm play by my opponent. No panic yet. Good for him. 
Let's see how calm he can stay. K16 works well with my 3-5 at C15. K16 also supports my O17 kakari (is that the right term?). I have a tendency to create too many weak groups (regardless of who has what handi) ... let's see if I can avoid that in this game. Only two weak stones left to defend.
I would say that, so far, Black has played well. However, Black has also played to avoid complications, too. That might be to White's advantage, if White can successfully assess the whole board and consistently pick larger moves than Black picks ...
However, as many on the boards here know, I'm not very strong at positional judgment. My main strengths lie in reading and complicated fighting. I've played all my first moves in an attempt to entice my opponent into a fight, where I'm much more likely to come out ahead. Instead, my opponent is not playing my game. This is good for him, because I'm more likely to make a game-defining mistake in a game without much complications. I wonder if my opponent knew that beforehand?
Anyways, since my opponent has selected such a calm path forward, I need to adjust and pull back the baying hounds of war. I'm satisfied with the exchange in the upper right, and now I need to solidify the two lower quadrants.
That doesn't mean I'm not looking at the weak areas in my opponent's formations ... here are some spots on the board that I'm eying for possible future attacks (the marked points aren't necessarily future moves, but weak points in my opponent's structure):
$$Bcm8 Possible future attack areas within Black's area of influence
$$ ---------------------------------------
$$ | . . . . . . . . . . . . . . . . . . . |
$$ | . . . . . . . . . . . . . . . . . . . |
$$ | . . . . . . . . . . . . . O . . b . . |
$$ | . . . , . . . . . O . . . . . X . . . |
$$ | . . O . . . . . . . . . . . . . . . . |
$$ | . . . . . . . . . . . . . . . X . . . |
$$ | . . . . . . . . . . . . . . . . . . . |
$$ | . . . . . . . . . . . . . . . . a . . |
$$ | . . . . . . . . . . . . . . . . . . . |
$$ | . . . , . . . . . , . . . . . , . . . |
$$ | . . . . . . . . . . . . . . . . d . . |
$$ | . . . . . . . . . . . . . . . . . . . |
$$ | . . . . . . . . . . . . . . . . X . . |
$$ | . . O . . . . . . . . . . . . . . . . |
$$ | . . . . . . . . . . . . . . . . h . . |
$$ | . . . X . . . . . , . . . . . X . . . |
$$ | . . c . g . X . f . . . . O . . e . . |
$$ | . . . . . . . . . . . . . . . . . . . |
$$ | . . . . . . . . . . . . . . . . . . . |
$$ ---------------------------------------
$$ ---------------------------------------
$$ | . . . . . . . . . . . . . . . . . . . |
$$ | . . . . . . . . . . . . . . . . . . . |
$$ | . . . . . . . . . . . . . O . . b . . |
$$ | . . . , . . . . . O . . . . . X . . . |
$$ | . . O . . . . . . . . . . . . . . . . |
$$ | . . . . . . . . . . . . . . . X . . . |
$$ | . . . . . . . . . . . . . . . . . . . |
$$ | . . . . . . . . . . . . . . . . a . . |
$$ | . . . . . . . . . . . . . . . . . . . |
$$ | . . . , . . . . . , . . . . . , . . . |
$$ | . . . . . . . . . . . . . . . . d . . |
$$ | . . . . . . . . . . . . . . . . . . . |
$$ | . . . . . . . . . . . . . . . . X . . |
$$ | . . O . . . . . . . . . . . . . . . . |
$$ | . . . . . . . . . . . . . . . . h . . |
$$ | . . . X . . . . . , . . . . . X . . . |
$$ | . . c . g . X . f . . . . O . . e . . |
$$ | . . . . . . . . . . . . . . . . . . . |
$$ | . . . . . . . . . . . . . . . . . . . |
$$ ---------------------------------------
- Click Here To Show Diagram Code
[go]$$Bcm8 Possible future attack areas within Black's area of influence

$$ ---------------------------------------

$$ | . . . . . . . . . . . . . . . . . . . |

$$ | . . . . . . . . . . . . . . . . . . . |

$$ | . . . . . . . . . . . . . O . . b . . |

$$ | . . . , . . . . . O . . . . . X . . . |

$$ | . . O . . . . . . . . . . . . . . . . |

$$ | . . . . . . . . . . . . . . . X . . . |

$$ | . . . . . . . . . . . . . . . . . . . |

$$ | . . . . . . . . . . . . . . . . a . . |

$$ | . . . . . . . . . . . . . . . . . . . |

$$ | . . . , . . . . . , . . . . . , . . . |

$$ | . . . . . . . . . . . . . . . . d . . |

$$ | . . . . . . . . . . . . . . . . . . . |

$$ | . . . . . . . . . . . . . . . . X . . |

$$ | . . O . . . . . . . . . . . . . . . . |

$$ | . . . . . . . . . . . . . . . . h . . |

$$ | . . . X . . . . . , . . . . . X . . . |

$$ | . . c . g . X . f . . . . O . . e . . |

$$ | . . . . . . . . . . . . . . . . . . . |

$$ | . . . . . . . . . . . . . . . . . . . |

$$ ---------------------------------------[/go]
$$Bcm8 White's weak areas up top
$$ ---------------------------------------
$$ | . . . . . . . . . . . . . . . . . . . |
$$ | . . . . . . . . . . . . . . . . . . . |
$$ | . . e a f . . c . . . d . O . . . . . |
$$ | . . . , b . . . . O . . . . . X . . . |
$$ | . . O . . . . . . . . . . . . . . . . |
$$ | . . . . . . . . . . . . . . . X . . . |
$$ | . . . . . . . . . . . . . . . . . . . |
$$ | . . . . . . . . . . . . . . . . . . . |
$$ | . . . . . . . . . . . . . . . . . . . |
$$ | . . . , . . . . . , . . . . . , . . . |
$$ | . . . . . . . . . . . . . . . . . . . |
$$ | . . . . . . . . . . . . . . . . . . . |
$$ | . . . . . . . . . . . . . . . . X . . |
$$ | . . O . . . . . . . . . . . . . . . . |
$$ | . . . . . . . . . . . . . . . . . . . |
$$ | . . . X . . . . . , . . . . . X . . . |
$$ | . . . . . . X . . . . . . O . . . . . |
$$ | . . . . . . . . . . . . . . . . . . . |
$$ | . . . . . . . . . . . . . . . . . . . |
$$ ---------------------------------------
$$ ---------------------------------------
$$ | . . . . . . . . . . . . . . . . . . . |
$$ | . . . . . . . . . . . . . . . . . . . |
$$ | . . e a f . . c . . . d . O . . . . . |
$$ | . . . , b . . . . O . . . . . X . . . |
$$ | . . O . . . . . . . . . . . . . . . . |
$$ | . . . . . . . . . . . . . . . X . . . |
$$ | . . . . . . . . . . . . . . . . . . . |
$$ | . . . . . . . . . . . . . . . . . . . |
$$ | . . . . . . . . . . . . . . . . . . . |
$$ | . . . , . . . . . , . . . . . , . . . |
$$ | . . . . . . . . . . . . . . . . . . . |
$$ | . . . . . . . . . . . . . . . . . . . |
$$ | . . . . . . . . . . . . . . . . X . . |
$$ | . . O . . . . . . . . . . . . . . . . |
$$ | . . . . . . . . . . . . . . . . . . . |
$$ | . . . X . . . . . , . . . . . X . . . |
$$ | . . . . . . X . . . . . . O . . . . . |
$$ | . . . . . . . . . . . . . . . . . . . |
$$ | . . . . . . . . . . . . . . . . . . . |
$$ ---------------------------------------
- Click Here To Show Diagram Code
[go]$$Bcm8 White's weak areas up top

$$ ---------------------------------------

$$ | . . . . . . . . . . . . . . . . . . . |

$$ | . . . . . . . . . . . . . . . . . . . |

$$ | . . e a f . . c . . . d . O . . . . . |

$$ | . . . , b . . . . O . . . . . X . . . |

$$ | . . O . . . . . . . . . . . . . . . . |

$$ | . . . . . . . . . . . . . . . X . . . |

$$ | . . . . . . . . . . . . . . . . . . . |

$$ | . . . . . . . . . . . . . . . . . . . |

$$ | . . . . . . . . . . . . . . . . . . . |

$$ | . . . , . . . . . , . . . . . , . . . |

$$ | . . . . . . . . . . . . . . . . . . . |

$$ | . . . . . . . . . . . . . . . . . . . |

$$ | . . . . . . . . . . . . . . . . X . . |

$$ | . . O . . . . . . . . . . . . . . . . |

$$ | . . . . . . . . . . . . . . . . . . . |

$$ | . . . X . . . . . , . . . . . X . . . |

$$ | . . . . . . X . . . . . . O . . . . . |

$$ | . . . . . . . . . . . . . . . . . . . |

$$ | . . . . . . . . . . . . . . . . . . . |

$$ ---------------------------------------[/go]