Hey,
Playing as a 1d? I lost by 1.5 points against this 1k taking white no komi ... After he let me get ahead (recover...) in the early-mid-game, I managed to... Solidly lose very many points in yose. I would be thankful for peoples' comments, especially on yose - if you could give me some examples of sente sequences I should have taken, that would especially be great.
Loons.
In which loons loses a reverse-sandbagging game (? vs 1k)
-
illluck
- Lives in sente
- Posts: 1223
- Joined: Sun Apr 25, 2010 5:07 am
- Rank: OGS 2d
- GD Posts: 0
- KGS: illluck
- Tygem: Trickprey
- OGS: illluck
- Has thanked: 736 times
- Been thanked: 239 times
Re: In which loons loses a reverse-sandbagging game (? vs 1k
I think a lot of the yose errors (e.g. it seems like P18 should have been taken by you first, L2 was quite small, a few aji-keshi moves after the F14 cut) are just because you were in byoyomi.
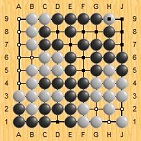
However, one sequence which started on move 114 at Q16 really jumped out at me. Not only is Q16 sort of a weaker shape, it was also aji-keshi. Doesn't P16 instead look better? Black can no longer try to save the two stones since any attempt will really damage the right side/corner.
However, one sequence which started on move 114 at Q16 really jumped out at me. Not only is Q16 sort of a weaker shape, it was also aji-keshi. Doesn't P16 instead look better? Black can no longer try to save the two stones since any attempt will really damage the right side/corner.
-
Loons
- Gosei
- Posts: 1378
- Joined: Tue Apr 20, 2010 4:17 am
- GD Posts: 0
- Location: wHam!lton, Aotearoa
- Has thanked: 253 times
- Been thanked: 105 times
Re: In which loons loses a reverse-sandbagging game (? vs 1k
Thanks. I guess time management earlier is also part of endgame strength...
This is sort of what was happening in my head, incidentally, I just clicked the wrong place when I tried to play it -_-
Could you give a short sequence to demonstrate from P16 instead?
PS: I am also already vaguely aware of how terrible a move G1 was
This is sort of what was happening in my head, incidentally, I just clicked the wrong place when I tried to play it -_-
Could you give a short sequence to demonstrate from P16 instead?
PS: I am also already vaguely aware of how terrible a move G1 was
-
illluck
- Lives in sente
- Posts: 1223
- Joined: Sun Apr 25, 2010 5:07 am
- Rank: OGS 2d
- GD Posts: 0
- KGS: illluck
- Tygem: Trickprey
- OGS: illluck
- Has thanked: 736 times
- Been thanked: 239 times
Re: In which loons loses a reverse-sandbagging game (? vs 1k
Ah, hehe. Your new sequence makes a lot more sense (though then black can O15 instead after 1, I think).
I was thinking wP16, then if black tries to run with O15 white can push through twice and then R16.
I must admit, though, that I missed 1 - if black can't O15 then your diagram is a better result (because if wP16 bP15 white can only N15, which ends in gote whereas your sequence ends in sente/H7 - though I would be a bit concerned about aji around N14).
-
illluck
- Lives in sente
- Posts: 1223
- Joined: Sun Apr 25, 2010 5:07 am
- Rank: OGS 2d
- GD Posts: 0
- KGS: illluck
- Tygem: Trickprey
- OGS: illluck
- Has thanked: 736 times
- Been thanked: 239 times
Re: In which loons loses a reverse-sandbagging game (? vs 1k
Also, I think black missed a chance at move 145 - H15 seems harder to deal with.
-
mitsun
- Lives in gote
- Posts: 553
- Joined: Fri Apr 23, 2010 10:10 pm
- Rank: AGA 5 dan
- GD Posts: 0
- Has thanked: 61 times
- Been thanked: 250 times
Re: In which loons loses a reverse-sandbagging game (? vs 1k
I like yose, so let's see if we can convert your 1.5 point loss into a 10+ point win 
118-123) turned out very badly. It would be much better to give up the W stone at Q16 in order to capture the B stone at M16, by playing move 118 at N16. Compared to the game, B gains something like 8 points in the corner, while W gains more than 12 points in the center.
132-139) forcing moves really gained nothing, because of your shortage of liberties, and B missed a chance to make the result even worse (atari before defending). Maybe just defend quietly at H14?
154) should be the large monkey jump to F1. B then cannot get an eye at the bottom, hence must connect above in gote. In the game, B made an extra point and eye at the bottom, then connected unnecessarily above, when larger moves were available (notably b7 atari).
180) was very small, 1 point gote at most. D6 and S9 were each 4 points gote. You could consider these moves miai (although B later got both). O5 was at least 2 points reverse sente.
-
Numsgil

- Lives in gote
- Posts: 614
- Joined: Wed Apr 21, 2010 10:07 am
- Rank: 1 Kyu KGS
- GD Posts: 0
- KGS: Numsgil
- Has thanked: 28 times
- Been thanked: 65 times
Re: In which loons loses a reverse-sandbagging game (? vs 1k
Just got done re-reading a book on contact fights, so, with some things still fresh in my newbie mind, I've commented on some positions. Not really yose-related, though...
Otherwise most moves jived with my understanding. Which makes sense since this was a relatively high level game