Page 1 of 2
3.3 invasion joseki problem
Posted: Mon Feb 24, 2014 6:57 am
by lordish
Hi i had an issue with 3.3 invasions so i went and look at a joseki.
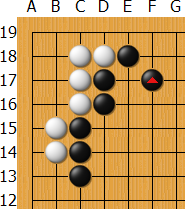
- joseki.png (9.08 KiB) Viewed 12338 times
As i was looking at it i tried to disrupt black from completely forming it by playing at F17 which looks fine and unpublishable also it gives some influence at least.
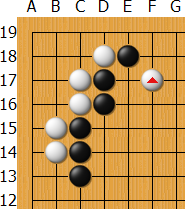
- joseki 2.png (9 KiB) Viewed 12338 times
Is there a way to punish the F17 move by white because all i came up is a jungle of variations with no good way to punish him.
Posted: Mon Feb 24, 2014 7:09 am
by EdLee
lordish wrote:Is there a way to punish the F17 move by white because all i came up is a jungle of variations with no good way to punish him.
Yes, it's trivial: can you see how to kill the D18 stone?

Re:
Posted: Mon Feb 24, 2014 7:11 am
by lordish
EdLee wrote:lordish wrote:Is there a way to punish the F17 move by white because all i came up is a jungle of variations with no good way to punish him.
Yes, it's trivial: can you see how to kill the D18 stone?
Yeah i saw that in all variation but still doesn't he escape with 2 points anyway?
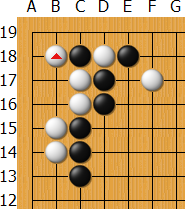
- joseki 3.png (9.36 KiB) Viewed 12332 times
Posted: Mon Feb 24, 2014 7:13 am
by EdLee
lordish wrote:As i was looking at it i tried to disrupt black from completely forming it by playing at F17 which looks fine and unpublishable also it gives some influence at least.
You currently need to learn to see atari, which is the point of the previous question on how to kill D18.
If you figure this out, then you realize all your "jungle of variations" are not necessary.
Your current understanding of "influence" is also quite incomplete:

F17 is not influence -- it's a very badly placed stone.
Posted: Mon Feb 24, 2014 7:14 am
by EdLee
lordish wrote:Yeah i saw that in all variation but still doesn't he escape with 2 points anyway?
Who escapes, and where ?
Posted: Mon Feb 24, 2014 7:19 am
by EdLee
Instead of screenshots, it's better to use diagrams (rotated for space):
$$
$$ | . . . . . . . . . . . . . . . . . . . |
$$ | . . X . . . . . . . . . . . . . . . . |
$$ | . X . . . . . . . . . . . . . . . . . |
$$ | . O X X . . . . . , . . . . . , . . . |
$$ | . O O O X X X . . . . . . . . . . . . |
$$ | . . . . O O . . . . . . . . . . . . . |
$$ | . . . . . . . . . . . . . . . . . . . |
$$ ---------------------------------------
- Click Here To Show Diagram Code
[go]$$

$$ | . . . . . . . . . . . . . . . . . . . |

$$ | . . X . . . . . . . . . . . . . . . . |

$$ | . X . . . . . . . . . . . . . . . . . |

$$ | . O X X . . . . . , . . . . . , . . . |

$$ | . O O O X X X . . . . . . . . . . . . |

$$ | . . . . O O . . . . . . . . . . . . . |

$$ | . . . . . . . . . . . . . . . . . . . |

$$ ---------------------------------------[/go]
Re: 3.3 invasion joseki problem
Posted: Mon Feb 24, 2014 7:20 am
by lordish
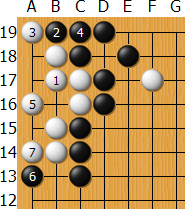
- joseki 4.png (11.36 KiB) Viewed 12324 times
I have a bunch of similar variations, my main question is if there is a way to kill his corner because i failed to see how.
Posted: Mon Feb 24, 2014 7:22 am
by EdLee
Posted: Mon Feb 24, 2014 7:25 am
by EdLee
lordish wrote:I have a bunch of similar variations, my main question is if there is a way to kill his corner because i failed to see how.
OK, asking if B can kill W is another, separate question.
But the first thing is for you to study why

is a nonsense move:
$$W
$$ | . . . . . . . . . . . . . . . . . . . |
$$ | . . . . . . . . . . . . . . . . . . . |
$$ | . . 1 . . . . . . . . . . . . . . . . |
$$ | . X . . . . . . . . . . . . . . . . . |
$$ | . O X X . . . . . , . . . . . , . . . |
$$ | . . O O X X X . . . . . . . . . . . . |
$$ | . . . . O O . . . . . . . . . . . . . |
$$ | . . . . . . . . . . . . . . . . . . . |
$$ -----------------------------------------
- Click Here To Show Diagram Code
[go]$$W

$$ | . . . . . . . . . . . . . . . . . . . |

$$ | . . . . . . . . . . . . . . . . . . . |

$$ | . . 1 . . . . . . . . . . . . . . . . |

$$ | . X . . . . . . . . . . . . . . . . . |

$$ | . O X X . . . . . , . . . . . , . . . |

$$ | . . O O X X X . . . . . . . . . . . . |

$$ | . . . . O O . . . . . . . . . . . . . |

$$ | . . . . . . . . . . . . . . . . . . . |

$$ -----------------------------------------[/go]
Posted: Mon Feb 24, 2014 7:29 am
by EdLee
Hi lordish, so you looked up this sequence. B gets the outside, and W lives in sente in the corner:
$$W
$$ | . . . . . . . . . . . . . . . . . . . |
$$ | . . . . . . . . . . . . . . . . . . . |
$$ | . . X . . . . . . . . . . . . . . . . |
$$ | . X . . . . . . . . . . . . . . . . . |
$$ | . O X X . . . . . , . . . . . , . . . |
$$ | . O O O X X X . . . . . . . . . . . . |
$$ | . . . . O O . . . . . . . . . . . . . |
$$ | . . . . . . . . . . . . . . . . . . . |
$$ -----------------------------------------
- Click Here To Show Diagram Code
[go]$$W

$$ | . . . . . . . . . . . . . . . . . . . |

$$ | . . . . . . . . . . . . . . . . . . . |

$$ | . . X . . . . . . . . . . . . . . . . |

$$ | . X . . . . . . . . . . . . . . . . . |

$$ | . O X X . . . . . , . . . . . , . . . |

$$ | . O O O X X X . . . . . . . . . . . . |

$$ | . . . . O O . . . . . . . . . . . . . |

$$ | . . . . . . . . . . . . . . . . . . . |

$$ -----------------------------------------[/go]
Re: 3.3 invasion joseki problem
Posted: Mon Feb 24, 2014 7:31 am
by HermanHiddema
lordish wrote:joseki 4.png
I have a bunch of similar variations, my main question is if there is a way to kill his corner because i failed to see how.
There's not much point to the main question, because that diagram contains too many mistakes.
should be at

and white lives easily (but has still played that that terrible move at F17)

is auto-atari, black can capture it by playing

at A18

is nonsense,

should push through at B13
Can this corner die? Not if white plays correctly
Does it matter? No, white is making huge losses anyway after the F17 mistake.
Posted: Mon Feb 24, 2014 7:34 am
by EdLee
If W deviates from the sequence and plays
, then naturally B kills

with
and
:
$$W
$$ | . . . . . . . . . . . . . . . . . . . |
$$ | . . . . . . . . . . . . . . . . . . . |
$$ | . . 1 . . . . . . . . . . . . . . . . |
$$ | . X . . . . . . . . . . . . . . . . . |
$$ | 4 W X X . . . . . , . . . . . , . . . |
$$ | . 2 O O X X X . . . . . . . . . . . . |
$$ | . 3 . . O O . . . . . . . . . . . . . |
$$ | . . . . . . . . . . . . . . . . . . . |
$$ -----------------------------------------
- Click Here To Show Diagram Code
[go]$$W

$$ | . . . . . . . . . . . . . . . . . . . |

$$ | . . . . . . . . . . . . . . . . . . . |

$$ | . . 1 . . . . . . . . . . . . . . . . |

$$ | . X . . . . . . . . . . . . . . . . . |

$$ | 4 W X X . . . . . , . . . . . , . . . |

$$ | . 2 O O X X X . . . . . . . . . . . . |

$$ | . 3 . . O O . . . . . . . . . . . . . |

$$ | . . . . . . . . . . . . . . . . . . . |

$$ -----------------------------------------[/go]
We compare the result on the left with the original sequence on the right:
on the left, W has already suffered a big loss because of
:
$$W
$$ | . . . . . . . . . . . . . . . . . . . |
$$ | . . . . . . . . . . . . . . . . . . . |
$$ | . . 1 . . . . . . . . . . . . . X . . |
$$ | . X . . . . . . . . . . . . . . . X . |
$$ | X . X X . . . . . , . . . . . X X O . |
$$ | . X O O X X X . . . . . X X X O O O . |
$$ | . O . . O O . . . . . . . O O . . . . |
$$ | . . . . . . . . . . . . . . . . . . . |
$$ -----------------------------------------
- Click Here To Show Diagram Code
[go]$$W

$$ | . . . . . . . . . . . . . . . . . . . |

$$ | . . . . . . . . . . . . . . . . . . . |

$$ | . . 1 . . . . . . . . . . . . . X . . |

$$ | . X . . . . . . . . . . . . . . . X . |

$$ | X . X X . . . . . , . . . . . X X O . |

$$ | . X O O X X X . . . . . X X X O O O . |

$$ | . O . . O O . . . . . . . O O . . . . |

$$ | . . . . . . . . . . . . . . . . . . . |

$$ -----------------------------------------[/go]
Re: 3.3 invasion joseki problem
Posted: Mon Feb 24, 2014 7:41 am
by lordish
Thanks to both of you i forgot the unique nature of the corner and somehow the atari at D18 didn't looked like a true punishment to me(he still gets the corner). I know that my knowledge of the game is really poor so can you please explain to me why F17 is that bad? Can he approach and kill it later?
Posted: Mon Feb 24, 2014 7:46 am
by EdLee
lordish wrote:somehow the atari at D18 didn't looked like a true punishment to me(he still gets the corner).
so can you please explain to me why F17 is that bad?
It's a good question. First, you think White "still gets the corner". Let's look at this for a moment:
If W wants to keep the corner, W needs to add a move

:
$$W
$$ | . . . . . . . . . . . . . . . . . . . |
$$ | . . . . . . . . . . . . . . . . . . . |
$$ | . . 1 . . . . . . . . . . . . . X . . |
$$ | . X . . . . . . . . . . . . . . . X . |
$$ | X . X X . . . . . , . . . . . X X O . |
$$ | . X O O X X X . . . . . X X X O O O . |
$$ | 5 O . . O O . . . . . . . O O . . . . |
$$ | . . . . . . . . . . . . . . . . . . . |
$$ -----------------------------------------
- Click Here To Show Diagram Code
[go]$$W

$$ | . . . . . . . . . . . . . . . . . . . |

$$ | . . . . . . . . . . . . . . . . . . . |

$$ | . . 1 . . . . . . . . . . . . . X . . |

$$ | . X . . . . . . . . . . . . . . . X . |

$$ | X . X X . . . . . , . . . . . X X O . |

$$ | . X O O X X X . . . . . X X X O O O . |

$$ | 5 O . . O O . . . . . . . O O . . . . |

$$ | . . . . . . . . . . . . . . . . . . . |

$$ -----------------------------------------[/go]
Again, we compare the 2 results. In the original sequence on the right, W takes the corner
in sente.
In the new sequence on the left, W keeps the corner, yes, but
in gote.
This is a big difference (in addition to the big loss of losing the one W stone).
The original
stone is also very badly placed -- it is too close to B's powerful wall.
Re:
Posted: Mon Feb 24, 2014 7:50 am
by Splatted
EdLee wrote:lordish wrote:I have a bunch of similar variations, my main question is if there is a way to kill his corner because i failed to see how.
OK, asking if B can kill W is another, separate question.
But the first thing is for you to study why
is a nonsense move:
$$W
$$ | . . . . . . . . . . . . . . . . . . . |
$$ | . . . . . . . . . . . . . . . . . . . |
$$ | . . . . . . . . . . . . . . . . . . . |
$$ | . . 1 . . . . . . . . . . . . . . . . |
$$ | . X . . . . . . . . . . . . . . . . . |
$$ | . O X X . . . . . , . . . . . , . . . |
$$ | . . O O X X X . . . . . . . . . . . . |
$$ | . . . . O O . . . . . . . . . . . . . |
$$ | . . . . . . . . . . . . . . . . . . . |
$$ -----------------------------------------
- Click Here To Show Diagram Code
[go]$$W

$$ | . . . . . . . . . . . . . . . . . . . |

$$ | . . . . . . . . . . . . . . . . . . . |

$$ | . . . . . . . . . . . . . . . . . . . |

$$ | . . 1 . . . . . . . . . . . . . . . . |

$$ | . X . . . . . . . . . . . . . . . . . |

$$ | . O X X . . . . . , . . . . . , . . . |

$$ | . . O O X X X . . . . . . . . . . . . |

$$ | . . . . O O . . . . . . . . . . . . . |

$$ | . . . . . . . . . . . . . . . . . . . |

$$ -----------------------------------------[/go]
I agree with this, but I think a little more guidance might be in order. White 1 seems to be a case of trying to steal the enemies vital point, but you have to understand why it's a vital point in order to know if that works.
$$W
$$ | . . . . . . . . . . . . . . . . . . . |
$$ | . . . . . . . . . . . . . . . . . . . |
$$ | . . . . . . . . . . . . . . . . . . . |
$$ | . c C . . . . . . . . . . . . . . . . |
$$ | d X a . . . . . . . . . . . . . . . . |
$$ | . O X X b . . . . , . . . . . , . . . |
$$ | . O O O X X X . . . . . . . . . . . . |
$$ | . . . . O O . . . . . . . . . . . . . |
$$ | . . . . . . . . . . . . . . . . . . . |
$$ -----------------------------------------
- Click Here To Show Diagram Code
[go]$$W

$$ | . . . . . . . . . . . . . . . . . . . |

$$ | . . . . . . . . . . . . . . . . . . . |

$$ | . . . . . . . . . . . . . . . . . . . |

$$ | . c C . . . . . . . . . . . . . . . . |

$$ | d X a . . . . . . . . . . . . . . . . |

$$ | . O X X b . . . . , . . . . . , . . . |

$$ | . O O O X X X . . . . . . . . . . . . |

$$ | . . . . O O . . . . . . . . . . . . . |

$$ | . . . . . . . . . . . . . . . . . . . |

$$ -----------------------------------------[/go]
Try reading out some variations starting with white moves at the various lettered points, then do the same with the next diagram, and also compare them to your move at the marked point:
$$W
$$ | . . . . . . . . . . . . . . . . . . . |
$$ | . . . . . . . . . . . . . . . . . . . |
$$ | . . . . . . . . . . . . . . . . . . . |
$$ | . c . . . . . . . . . . . . . . . . . |
$$ | d X a . . . . . . . . . . . . . . . . |
$$ | . . X X b . . . . , . . . . . , . . . |
$$ | . O O O X X X . . . . . . . . . . . . |
$$ | . . . . O O . . . . . . . . . . . . . |
$$ | . . . . . . . . . . . . . . . . . . . |
$$ -----------------------------------------
- Click Here To Show Diagram Code
[go]$$W

$$ | . . . . . . . . . . . . . . . . . . . |

$$ | . . . . . . . . . . . . . . . . . . . |

$$ | . . . . . . . . . . . . . . . . . . . |

$$ | . c . . . . . . . . . . . . . . . . . |

$$ | d X a . . . . . . . . . . . . . . . . |

$$ | . . X X b . . . . , . . . . . , . . . |

$$ | . O O O X X X . . . . . . . . . . . . |

$$ | . . . . O O . . . . . . . . . . . . . |

$$ | . . . . . . . . . . . . . . . . . . . |

$$ -----------------------------------------[/go]
A lot of these won't involve anything as dramatic as one side dying, but hopefully you can see that white has a much harder time fighting dealing with the moves in the first diagram. Can you now see why black plays that point and why it doesn't make sense for white to play there as you did?